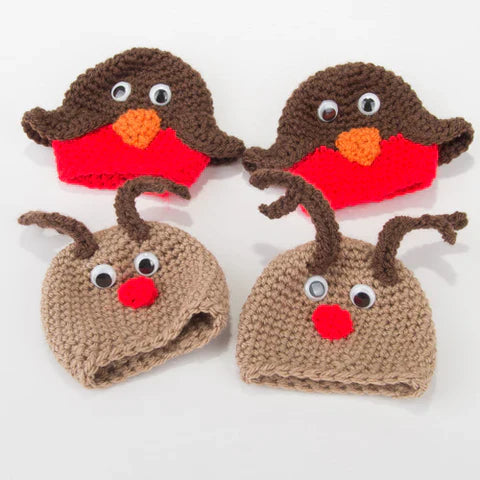
They're not Terry's...

Chocolate Orange covers - they are everywhere at this time of year. But do you think I could find a pattern I was happy with?! Every time I started one, I decided I didn't quite like how it sat, or where it finished, or how it was done up at the bottom (sewing in elastic? If you read my last post, you'll see why that is a no-no). I just wanted to crochet and be done with it.
After all, I was making 8 of them - nursery teacher presents. And I'd (as usual) left it really late, and the last day of term was looming. So it needed to be right, but it also needed to be quick, and I'd run out of time to keep searching for the perfect pattern!
One of the best patterns I could find was Jane Brooker's pattern, but despite how cute they looked, it wasn't *quite* what I wanted (not that I am fussy or anything). So I began to fiddle and change things, undoing and redoing a million times (and driving poor Mr Sconch mad as I huffed and puffed on the sofa next to him). One of the main changes I made was with the wings. I wanted him to look like he could fly...

Once I had done the robin, and made 4 of them, I decided I had had quite enough of that, and had a root round in my big box of yarn (ahem. *one* of my big boxes of yarn) for some inspiration. I found a ball of Mocha in Stylecraft Special DK which was just screaming to be made into a reindeer...

I've put my pattern below. I am not in any way claiming that this is a wholly original pattern (I certainly haven't stolen it!) but this is the pattern I ended up using...
I used acrylic DK and a 4mm hook (I hooked quite tightly for this, so you may find you need to go down to a 3.5mm depending on your tension. When it is finished, it should be quite a struggle to get it over the top of the chocolate orange - but it will go! And then it will sit nice and snug at the bottom)

Robin
Body:
With brown yarn:
Round 1: 6 dc into Magic Circle
Round 2: 2dc into each stitch (12 stitches)
Round 3: 1dc into first stitch, 2dc into next stitch, repeat to end (18 stitches)
Round 4: 1dc, into first two stitches, 2dc into next stitch, repeat to end (24 stitches)
Round 5: 1dc into first three stitches, 2dc into next stitch, repeat to end (30 stitches)
Round 6: 1dc into first four stitches, 2dc into next stitch, repeat to end (36 stitches)
Round 7-11: 1dc into each stitch (36 stitches)
Change to Red
Round 12-17: 1dc into each stitch (36 stitches)
Round 18: 1dc into first four stitches, dc2tog, repeat to end (30 stitches)
Round 19: 1dc into first three stitches, dc2tog, repeat to end (24 stitches)
Round 20: 1dc into each stitch (24 stitches)
Fasten off
The wings:
6dc into magic circle do no join together! Turn your work.
2 dc in each stitch (12 stitches). Turn
2 dc into each stitch, but missing last stitch (22 stitches). Turn
1dc into each stitch, but missing last stitch (21 stitches)
Fasten off
To attach the wings, spread the wing out so the 'V' lies flat along the join of the red and brown on the body. Whip stitch along with brown yarn and secure on the inside of the body. It will be a bit fiddly, but once you've sewn it on, the wing will then ruffle up nicely.
The beak:
Chain 6
Dc into each stitch (6 stitches). Turn
Dc, dc2tog, dc2tog, dc (4 stitches). Turn
Dc, dc2tog, dc.
Turn. Dc into final stitch

Reindeer
Body:
Round 1: 6 dc into Magic Circle
Round 2: 2dc into each stitch (12 stitches)
Round 3: 1dc into first stitch, 2dc into next stitch, repeat to end (18 stitches)
Round 4: 1dc, into first two stitches, 2dc into next stitch, repeat to end (24 stitches)
Round 5: 1dc into first three stitches, 2dc into next stitch, repeat to end (30 stitches)
Round 6: 1dc into first four stitches, 2dc into next stitch, repeat to end (36 stitches)
Round 7-17: 1dc into each stitch (36 stitches)
Round 18: 1dc into first four stitches, dc2tog, repeat to end (30 stitches)
Round 19: 1dc into first three stitches, dc2tog, repeat to end (24 stitches)
Round 20: 1dc into each stitch (24 stitches)
Fasten off.
Antler 1:
Chain 16
Dc into each stitch. Turn
Slip stitch in 2nd chain from hook, and then sl st into next 8 stitches
Chain 5, dc in 2nd ch from hook. Dc in next 3 st
sl st into next stitch on main branch of antler, then sl st to end.
Fasten off.
Antler 2:
Chain 16
Dc into each stitch. Turn
Slip stitch in 2nd chain from hook, and then sl st into next 4 stitches
Chain 5, dc in 2nd ch from hook. Dc in next 3 st
sl st into next stitch on main branch of antler, then sl st to end.
Fasten off.

Of course you can then change up the colours and make whatever figures you want...
If I can bear to look at another chocolate orange, I'll have a go and show you ;)
Sam x

